
1. Introduction
If you want to keep your Linux server safe - the best advice I can give by far is to use SSH keys instead of standard passwords to access it.
Standard passwords, although sent to the server in a secure manner are typically not sufficiently complex or long enough to withstand repeated persistent and attacks.
As I recently found out myself, having your password-protected account hacked by brute force is a very real danger.
Trivia: What is a brute force attack? In a brute force attack, automated software is used to generate a large number of consecutive guesses of a password in order to gain entry. SSH keys are a reliable and secure alternative.
This tutorial I will show you how to set up SSH Key-Based Authentication. As a bonus, I will also show you how you can connect to server seamlessly using PuTTY.
For reference, I run my Linux server on Ubuntu at digitalocean.com.
2. What is an SSH Key?
A pair of encryption keys called the personal key and the public key are generated. These are essentially two files that match mathematically.
The public key is like a lock, not really a key. You can make lots of copies of it and distribute it wherever you need it.
If you want to put your lock on another machine or server, it’s as simple as copying it to authorized_keys subfolder in the ~/.ssh folder found on most operating systems. That's how you set up the padlock.
The private key therefore is the actual key that opens that lock. It’s stored on the machine that wants to access your server.
When a client attempts to authenticate using an SSH key, the server will check whether the user possess the associated private key. If presented, a session key is created using a Key Exchange Algorithm. This is a mathematical formula which decodes the encrypted content of either key
Just like with a regular key, you must keep it safely out of sight and NEVER share it. Otherwise, anyone can gain access.
Trivia: History of SSH Keys In the summer of 1995, a sniffing attack struck the University of Helsinki where Tatu Ylonen, a researcher was working. A sniffing attack intercepts and logs network traffic providing hackers with usernames and passwords. Thousands of credentials, including those from community partnerships, were compromised. The severity of this attack prompted Tatu to figure out how networks could be safely secured leading him to later create the SSH protocol (SSH.com).
4. Advantages of using SSH keys
The private key is kept within a restricted directory. The SSH client will not recognise private keys that are not kept in a particular directory. The key itself must also have restricted permissions (read and write only available for the owner) which prevents other users on the system from snooping.
The private SSH key is never exposed to the network. If you opt to protect your key with a local passphrase (more on that later), the passphrase is only used to access the key on the local machine and cannot be brute forced.
Hackers hoping to break the passphrase of the private SSH key must already have access to the system via your user account or root account. So, if you do protect your key with a passphrase, it will prevent the hacker from automatically signing into your other servers.
5. Creating SSH Keys
The first step in configuring your server with SSH key encryption is to create a pair of SSH keys on your local computer.
We can use a utility called ssh-keygen to do this, which is included in the standard OpenSSH software suite. This will generate an "RSA key pair of 2048 bit" by default, which is perfect for most uses.
Check out Wikipedia's RSA article to learn more on this cryptosystem.
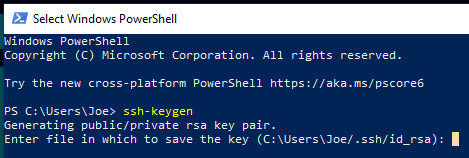
On your local computer, launch the console: If using Windows, use PowerShell.
Generate a SSH key pair by typing:
ssh-keygen
The utility will prompt you to pick a location for the generate keys.
The keys are placed by default in the ~/.ssh file of the home folder of your user. The private key is id_rsa and the related public key is called id_rsa.pub.
Generally, it’s best to stick with the default location at this point as this enables your SSH client to automatically authenticate your SSH keys. Changing the default path requires a bit of rewiring.
If you've generated a SSH key pair before, you might see a prompt that looks like this:

You will no longer be able to authenticate using the previous key if you choose to overwrite the password on the disk. When choosing yes, be very cautious, as this is a destructive process that can not be reversed.
Next, a passphrase for the key will be prompted.

This is an optional passphrase (and the passphrase we discussed in section 4!), which is useful for protecting the private key locally on disk.
Since your private key is not exposed to the network and is protected through file permissions, no one except you (and/or the root owner) should have access to this file. In the event of a breach, the passphrase serves as an additional layer of protection.
I recommend using a passphrase, but if you don't want to use a passphrase, simply press ENTER to bypass the prompt. If you do enter one, you’ll need to provide it every time you use the key, unless you are running an SSH agent software that stores the decrypted key
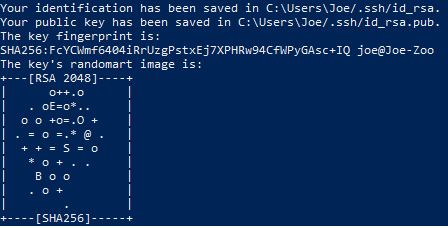
Voilà! You now have a private and public key to authenticate with. The next move is to place the public key onto your server so that you can log in using SSH key authentication.
6. Set up an email alert when a ssh login is successful
You might want to implement this cool functionality which I use as an additional safety measure for my server.
One way to do this is with pam_exec. Here’s a good guide for those of you in need of an explanation of what PAM is and how it works.
One advantage of using PAM is that this can also be easily adapted to login types other than SSH (such as local logins or even all logins) by connecting into a different file in /etc/pam.d/.
You must first be able to send an email from the command line. mail (which is often already installed by default) is a good option.
Then you need to make an executable script file login-notify.sh, which I usually keep in a folder at /etc/ssh/. Include the following content:
#!/bin/sh

# Change these two lines:
sender="username@localhost
recipient="[email protected]"

if [ "$PAM_TYPE" != "close_session" ]; then
    host="`hostname`"
    subject="SSH Login: $PAM_USER from $PAM_RHOST on $host"
    # Message to send, e.g. the current environment variables.
    message="`env`"
    echo "$message" | mail -r "$sender" -s "$subject" "$recipient"
fi
Modify the variables to change the subject and content of the e-mail notification to your liking.
Here we are using our internal mail provider, xxx@localhost. Check this out to learn to do SMTP configuration.
Don't forget to execute sudo chmod +x /etc/ssh/login-notify.sh to make it executable.
Once you have that, you can add the following line to/etc/pam.d/sshd
session optional pam_exec.so seteuid /etc/ssh/login-notify.sh
Notice we have set it as optional, this is so that you can still log in if the execution fails.
After you made sure that it works, you can change optional to required.
Then login won't be possible unless the hook script executes successfully (if that is what you want).
Source: https://askubuntu.com/questions/179889/how-do-i-set-up-an-email-alert-when-a-ssh-login-is-successful
7. Embedding your Public Key to your server’s root account.
On Digital Ocean, you can Embed your Public Key using their UI when Creating your Server
Return back to PowerShell, type:
cat ~/.ssh/id_rsa.pub | ssh username@remote_host "mkdir -p ~/.ssh && chmod 700 ~/.ssh && cat >> ~/.ssh/authorized_keys"
• username is your linux server root login • remote_host is your server’s IP address
Type in your server’s password when prompted.
You will see output that looks like this:
Number of key(s) added: 1
Now try logging into the machine, with:   "ssh '[email protected]'"
and check to make sure that only the key(s) you wanted were added.
Uploading your id_rsa.pub key is a simple as that!
8. Configuring PuTTY to log into server from Windows using SSH
Personally, I use the PuTTY application to connect to my server.
PuTTY is an open-source SSH and Telnet client for Windows. You can connect securely from a local Windows computer to remote servers. To install PuTTY, visit the PuTTY website and select from the package file list the Windows installer.
- Use PuTTY Gen to convert your key to a PuTTY readable format. PuTTY Gen comes bundled with PuTTY.
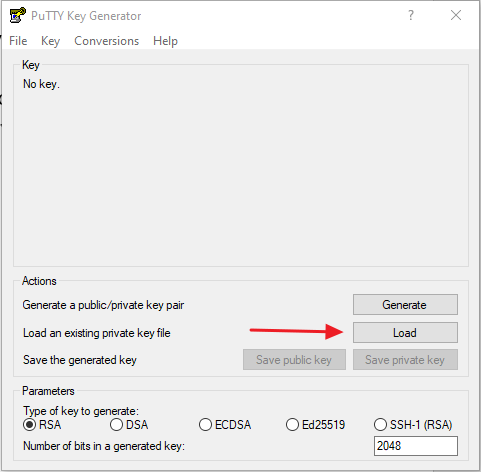
Load your key at C:\Users\YourUserName\.ssh (if you saved to the default location) and hit generate.
The default values are suitable for most situations.
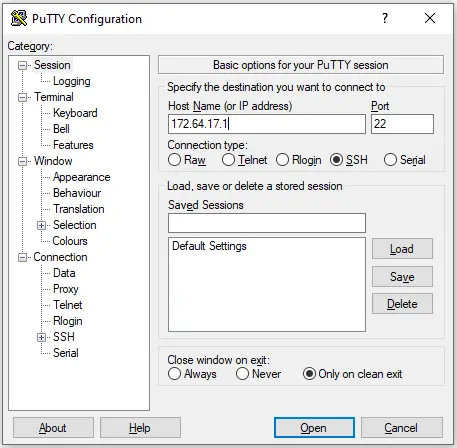
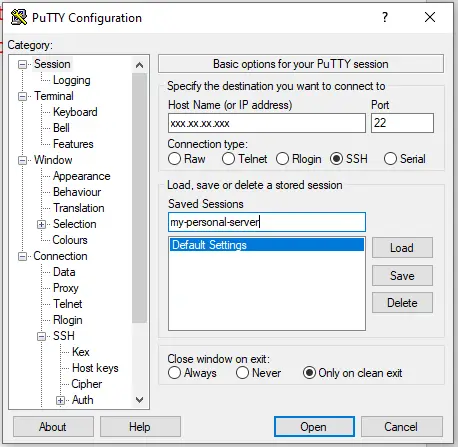
- Add the Droplet IP and Connection Details
On the PuTTY Configuration screen, fill in the field labelled Host Name typically your server’s IP address.
Confirm that the Port is set to 22 and that the Connection type SSH is selected.
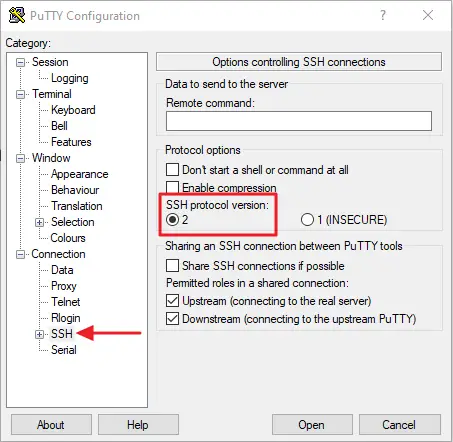
- Verify the SSH Protocol
Next, in the left sidebar of the box, click the SSH button. Ensure 2 is chosen for the version of SSH protocol.
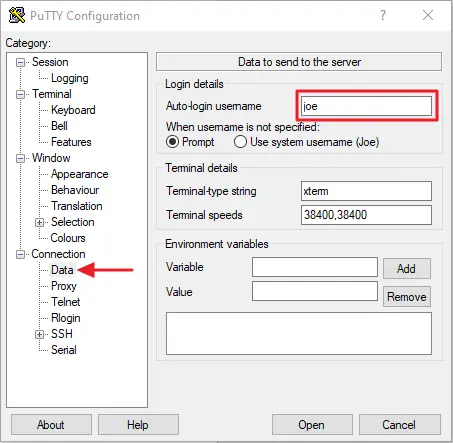
- Add your Username
In the Connection subheading in the Data configuration section, enter the username of your server in the Auto-login username field.
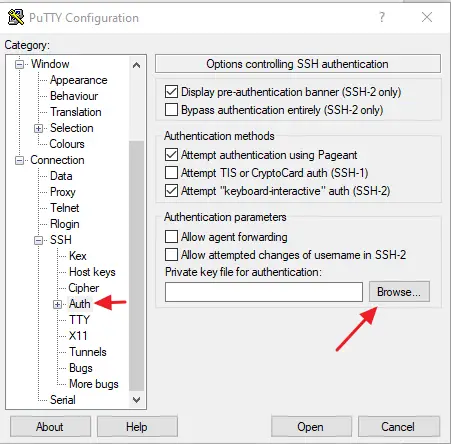
- Add your SSH private key
Use the Browse button in the Auth tab to navigate to your converted SSH key.
- Save your Preferences
Finally, you can save these preferences on the Session menu in order to avoid repeating yourself in the future.
Just add a name in the text box under Saved Sessions and click Save on the right.
9. Test you can log in through PuTTY
Now you’re ready to log into your server with your shiny new key.
Hit Enter or click Open on the Putty screen.
If this is your first time connecting to this host though putty, you may see the following output.
The authenticity of host '111.111.11.111 (111.111.11.111)' can't be established.
ECDSA key fingerprint is fd:fd:d4:f9:78:fe:73:86:e1:55:00:ad:d7:6d:24:fe.
Are you sure you want to continue connecting (yes/no)? yes
This is just your local computer saying that it does not recognize the remote host, which is to be expected. Type “yes” and press ENTER to continue.
You'll log in immediately if you didn’t set a passphrase for your private key, otherwise, you’ll be prompted to provide it.
If you’ve managed to log in – congratulations! However, your password-based authentication mechanism is still active, and your server remains vulnerable to brute-force attacks.
Now let’s disable traditional password authentication to your server in the next step.
10. Disabling traditional Password Authentication on your Server
This step will disable traditional password only access to your server.
Once you’ve both double and tripled-checked that you can log in, log in again either as root or with an account with sudo privileges.
Open the SSH Daemon’s configuration file:
sudo nano /etc/ssh/sshd_config
Inside the file, search for a directive called PasswordAuthentication. This may be commented out, if so, uncomment the line and ensure that its value is set to no.
PasswordAuthentication no
Save and close the file when you are finished. To implement the change, you must restart the service.
On Ubuntu or Debian machines, to restart you can execute the following command:
sudo service sshd restart
On CentOS/Fedora machines, the daemon is called sshd:
sudo service sshd restart
Job done! You’ve successfully changed your SSH daemon to only respond to SSH keys.