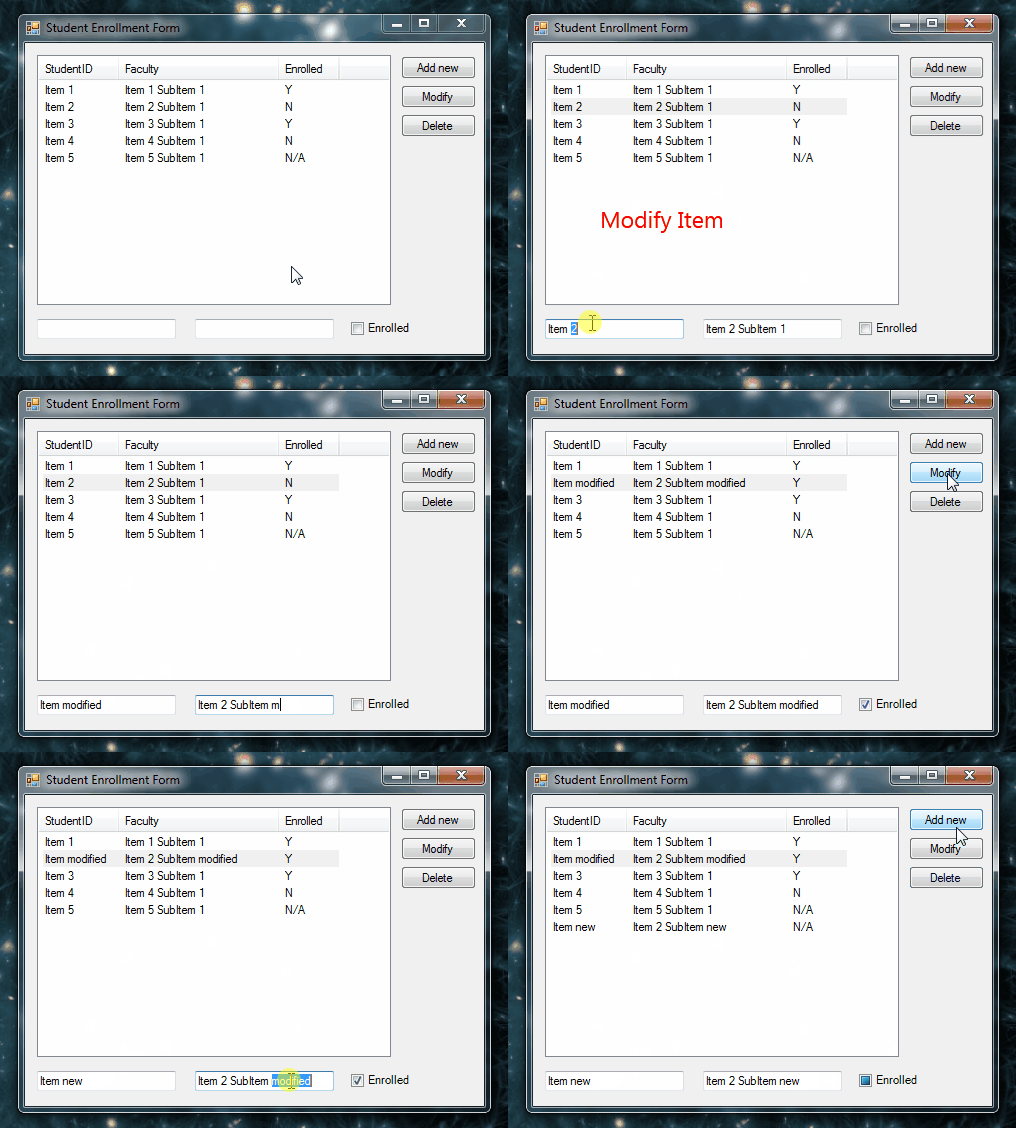
SAMPLE PROJECT
This article has a sample project for you to play around with for free, download it @ https://github.com/Scribbio/Column-binding-in-WinForms-ListView-).
Introduction

In this tutorial, we will look at binding a form control such as a label and checkbox to a ListView column in .NET (4.7) WinForms (Window Forms). Its features will include:
- Updating the content/CheckState of the bound control where there is a selection change on the ListView
- Using a button to modify the column’s item with the value contained in the bound control
- Create and add a new item to the listview according to values present in the bound controls
What is data binding?
The concept of data binding is generally about separating an app's layout from it's data. In practice, that means binding a UI component like a textbox or label with a code behind-object, ie. a string. Any changes made to the variable will automatically update the UI component and vice versa.
Data binding promotes a healthy separation of concerns, whereby the UI can focus on displaying data and not modifying it. It also removes the requirement for auxiliary functions in your form or backend code like "field.setText(val)" _
The Plan
When you construct a WinForms ListView using code (and not via the designer), to add columns you typically make instances of ColumnHeader to add to the ListViews column collection. For example:
// Create a ListView instance:
ListView lv1 = new ListView();

// Make column header
ColumnHeader columnHeader = new ColumnHeader();
columnHeader.Text = "Column Title";
columnHeader.Width = 40;

// Add column header to ListView
lv1.Columns.Add(columnHeader);
We will use inheritance to create our own custom column headers and leverage the power of polymorphism to add it to a ListView in the same way that you would with the standard ColumnHeader.
Inheritance
In c #, Inheritance is one of the key principles of object-oriented programming (OOP) and is used to inherit the properties one class (base) to another (child) class. Inheritance allows us to create a new class to reuse, extend and modify the behaviour of the parent class. Inheritance is also one way to achieve polymorphism which allows us to treat objects of different types in a similar manner. For example: Student and Teacher both inherit from type Person, and Person can Move. If you have an instance of a Person then you can call Move() without knowing or caring what type of Person it is. This is the strategy we're going to apply to the ColumnHeader.
Putting the plan into action
1. Create a new class and name it MyColumnHeader.cs
2. Add the following code
using System.ComponentModel;
using System.Windows.Forms;
using System.Linq;

public class MyColumnHeader : ColumnHeader
{
    [DefaultValue(typeof(Control), null)]
    public Control Control { get; set; }

    [DefaultValue("")]
    public string SelectValues { get; set; } = "";

    public string GetTextFromDispatching()
    {
        // if no control is linked to the column return Nothing
        string text = null;

        if (Control != null)
        {
            if (Control.GetType().GetProperty("CheckState") != null)
            {
                text = this.GetCheckValue();
            }
            else
            {
                text = Control.Text;
            }
        }

        return text;
    }

    /*
    * returns "Y" or "N" depending on whether a bound checkbox is checked or not
    * if CheckBox has three check states (ThreeState = true) return "N/A"
    */
    public string GetCheckValue()
    {
        string checkValue = "";
        if (Control != null && Control.GetType().GetProperty("CheckState") != null)
        {
            CheckState StateValue;
            StateValue = (CheckState)Control.GetType().GetProperty("CheckState").GetValue(Control);
            var valeurs = SelectValues.Split('|');
            if (StateValue == CheckState.Checked)
            {
                if (!string.IsNullOrEmpty(SelectValues))
                    checkValue = valeurs.Length > 0 ? valeurs[0] : "";
                else
                    checkValue = "Y";
            }
            else if (StateValue == CheckState.Unchecked)
            {
                if (!string.IsNullOrEmpty(SelectValues))
                    checkValue = valeurs.Length > 1 ? valeurs[1] : "";
                else
                    checkValue = "N";
            }
            else if (StateValue == CheckState.Indeterminate)
            {
                if (!string.IsNullOrEmpty(SelectValues))
                    checkValue = valeurs.Length > 2 ? valeurs[2] : "N/A";
                else
                    checkValue = "N/A";
            }
        }

        return checkValue;
    }

    /* updates the checkbox checkstate according to the value contained in the selected ListView row
    * "Y", "Yes", "T", "True" will "check" the bound checkbox
    * "N", "No", "F", "False" will "uncheck" the checkbox
    * other values will produce an "indeterminate" state
    */
    public CheckState GetCheckState(string valueChecked)
    {
        CheckState checkState;
        string[] vals = { "Y", "Yes", "T", "True" };

        if (!string.IsNullOrEmpty(SelectValues))
        {
            var valeurs = SelectValues.Split('|');
            if (valueChecked.Equals(valeurs.Length > 0 ? valeurs[0] : ""))
                checkState = CheckState.Checked;
            else if (valueChecked.Equals(valeurs.Length > 1 ? valeurs[1] : ""))
                checkState = CheckState.Unchecked;
            else
                checkState = CheckState.Indeterminate;
        }
        else if (vals.Any(x => x.Contains(valueChecked)))
            checkState = CheckState.Checked;
        else if (new[] { "N", "No", "F", "False" }.Contains(valueChecked))
            checkState = CheckState.Unchecked;
        else
            checkState = CheckState.Indeterminate;
        return checkState;
    }
}
Explaining the code
Firstly, we are adding a property of type control to store the control we want to link to the column.
Our second important property is SelectValues. In the case where the linked control is a CheckBox, this allows to store which values we want to appear in our ListView depending on whether or not the bound CheckBox is checked, unchecked or "inbetween". This is achieved by passing a string containing a pipe character in order to differentiate between the two values when we instantiate a MyColumnHeader, for example, "Y|N".
The GetTextFromDispatching() method retrieves the textual content from the attached control.
The two methods, GetCheckValue() and GetCheckState() are for handling bound CheckBox controls.
GetCheckValue() GetCheckValue() is for updating a value contained in the ListView from a bound CheckBox. As mentioned above, this method will split the defined values in SelectValues depending on whether a bound CheckBox is checked and return an associated textual value. In our example, "Y" (yes) is when the control is checked and "N" (no) for when it is unchecked. If your CheckBox has three possible check states (When the CheckBox.ThreeState = true), the example code returns "N/A"
GetCheckState() Contrary to GetCheckValue(), this method updates the bound CheckBox CheckState according to the value contained in the selected ListView row,. In our example, the values "Y", "Yes", "T", "True" will check the bound CheckBox and "N", "No", "F", "False" will uncheck the CheckBox, other values will produce an "indeterminate" state.
3. Add MyColumnHeader to your ListView
Thanks to polymorphism, you can add the MyColumnHeader to your ListViews in the same way that you would with the standard ColumnHeader. Note, you cannot add these columns directly in the designer with this bare-bones approach.
Label/Text box example:
<ListView>.Columns.Add(new MyColumnHeader() { Text = "Header", Name = "Header1", Width = 40, TextAlign = HorizontalAlignment.Left, Control = textBox1 });
Check box example:
<ListView>.Columns.Add(new MyColumnHeader() { Text = "Enrolled", Name = "Header2", Width = 60, TextAlign = HorizontalAlignment.Left, Control = checkBox1, SelectValues = "Y|N|N/A" });
4. Add the binding methods
These methods will be linked to events in your form. Such as clicking on a button or changing the selected index in the ListView.
- ModifyItem() – This function will modify the value of the selected item with the values of the bound controls.
public ListViewItem ModifyItem()
{
    ListViewItem item = null;
    if (lv1.SelectedItems.Count == 1)
    {
        item = lv1.SelectedItems[0];
        foreach (MyColumnHeader column in lv1.Columns)
        {
            string text = column.GetTextFromDispatching();
            if (text != null)
            {
                item.SubItems[column.Index].Text = text;
            }
        }
    }
        return item;
    }
- AddItem() – This function uses the values of the bounded controls to create and add a new item to the listview.
public ListViewItem AddItem(int itemIndex = -1)
{
    ListViewItem AddItemRet = default(ListViewItem);
    var subitems = new string[lv1.Columns.Count - 1 + 1];
    foreach (MyColumnHeader column in lv1.Columns)
    {
        string text = column.GetTextFromDispatching();
        if (text != null)
            subitems[column.Index] = text;
        else
            subitems[column.Index] = "";
    }
    var item = new ListViewItem(subitems);
    if (itemIndex >= 0)
        AddItemRet = lv1.Items.Insert(itemIndex, item);
    else
    {
        AddItemRet = lv1.Items.Add(item);
        item.EnsureVisible();
    }
    return AddItemRet;
}
- Dispatching() –
This function transfers the values of the selected row to their bounded controls.
private void Dispatching()
        {
            if (lv1.SelectedItems.Count == 1)
            {
                foreach (ColumnHeader column in lv1.Columns)
                {
                    if (column.GetType().Equals(typeof(MyColumnHeader)))
                    {
                        var uColumn = (MyColumnHeader)column;
                        Control controler = uColumn.Control;
                        if (controler != null)
                        {
                            ListViewItem item = lv1.SelectedItems[0];
                            if (controler.GetType().GetProperty("CheckState") != null)
                            {
                                controler.GetType().GetProperty("CheckState").SetValue(controler, uColumn.GetCheckState(item.SubItems[column.Index].Text));
                            }
                            else {
                                controler.Text = item.SubItems[column.Index].Text;
                            }
                        }
                    }
                }
            }
        }
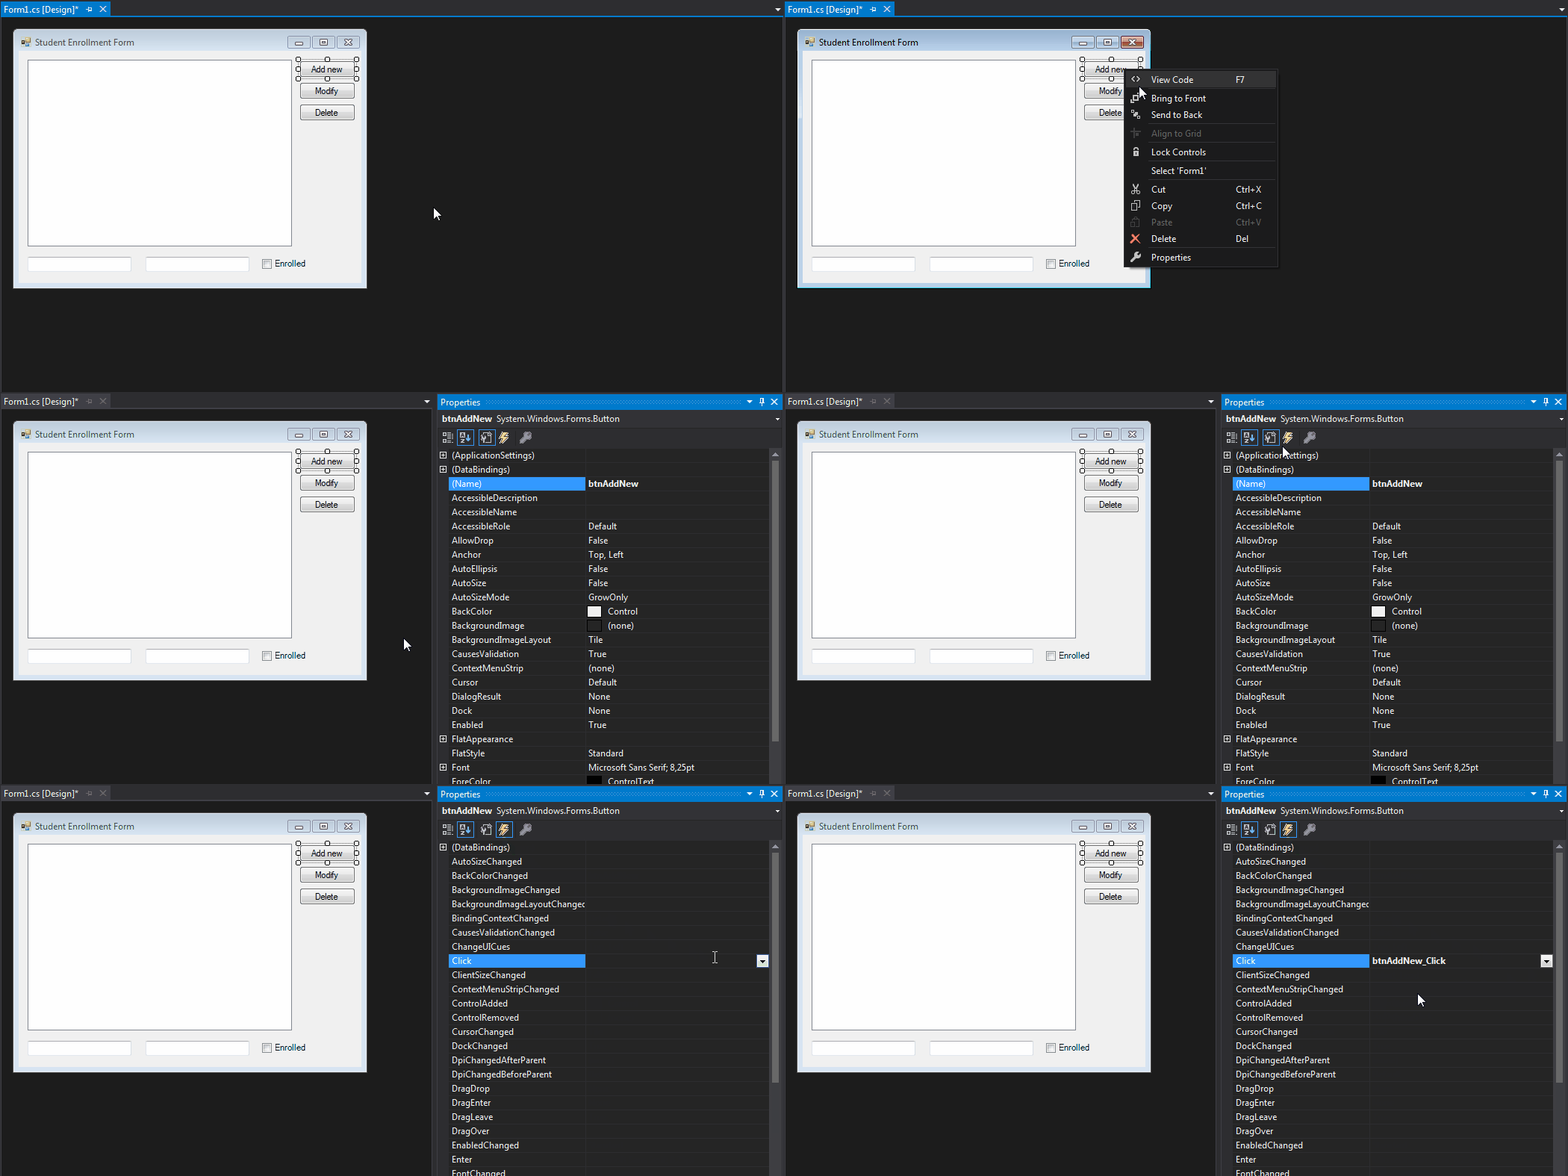
5. Add the events
You need to associate the above binding methods with with events on your form. Here are the examples from the sample project. You can set these in the designer.

// when the ListViewItem index is changed
private void lg_ItemSelectionChanged(object sender, ListViewItemSelectionChangedEventArgs e)
{
    Dispatching();
 }

// when the Add button is clicked
  private void buttonAddNew_Click(object sender, EventArgs e)
  {

      AddItem();
  }

// when the edit button is clicked
  private void buttonEdit_Click(object sender, EventArgs e)
  {
      ModifyItem();
  }
Note, the sample project contains an additional event to handle a contextual menu.
Oh and don't forget to put your handlers in your form's load event.
// Add handling for the RightClick Event for contextual menu
<ListView>.MouseClick += new MouseEventHandler(lg_MouseClick);
// Add handling for the ListViewItem change Event
<ListView>.ItemSelectionChanged += new ListViewItemSelectionChangedEventHandler(lg_ItemSelectionChanged);
Summary
Long gone are the days worrying about updating various controls on your form.
Use binding and focus on what matters, the underlying data.
Replicate the same format across your forms for both faster development time.