Complete guide to hosting an ASP.NET Core app on your Linux clearly explained and broken down for beginners
1. Introduction
We don’t often stop to consider the actual mechanics of the internet. But that comes at the peril of data security breaches and identity theft when you view cat memes, 24 hour news updates, and great online deals!
Luckily, we work with those who are able to configure the web in a way that's safe for us to use and you may be accessing this page through a safety measure called a proxy server, particularly if you're browsing from your cooperate office or university computer lab.
A proxy server is a mediator, which offers web administrators more control and security over client machines connecting to a server.
In order to make our Linux hosted .Net Core application visible to the internet, we need to configure a reverse proxy server which as the name implies, is the same concept in reverse and acting on behalf of servers. More on that later.
This tutorials opts to use one of the most popular reverse proxies around, NGINX.
2. Making sense of proxy servers
2.1 What is a forward proxy?
Before we get into configuring Nginx to service our application as a reverse proxy, let’s see how the standard proxy server works, often also referred to as a forward proxy, proxy server, or web proxy.
A proxy is essentially a gateway that sits in between a group of clients, which are other computers typically belonging to the common internal network of an organisation, and any number of servers handling FTP services and internet access.
Requests made to the servers by clients have to travel through the proxy, which will then attempt to access the site or service the client was trying to reach on his behalf. This is said to be "by proxy."
Depending on the forward proxy's settings, a request can be allowed or denied. From the point of view of the server, it is the proxy server that issued the request, not the client. So, when the server replies, it directs its response to the proxy.
2.2 Uses of a forward proxy
Acting as a single point of access and control, it makes it easier for organisations to enforce varying levels of functionality, security, and privacy depending on use case and company policy. For example, a school network might be configured to connect to the web through a proxy which enables content filtering rules such as refusing to forward responses from Facebook and other social media sites.
To avoid state or institutional browsing restrictions. A forward proxy can be used to get around these restrictions, as they let the user connect to the proxy rather than directly to the sites they are visiting.
Increased anonymity online. Using a forward proxy to connect to a website will make a user’s IP address harder to trace back to the user, as only the IP address of the proxy server will be visible.
2.3 What is a reverse proxy?
Right! We’ve covered what a forward proxy does, however, for our purposes we need to use a reverse proxy.
- So, where a forward proxy is an intermediary for its associated clients to contact any number of servers. The reverse proxy is an intermediary for any one server to be contacted by any number of clients.
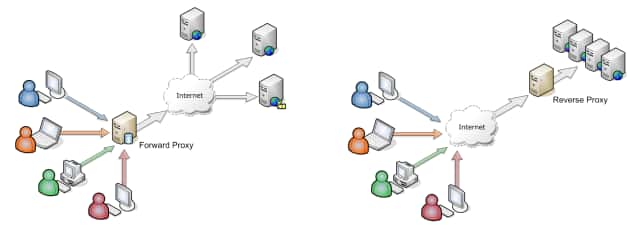
From the client’s perspective, he is accessing the server is accessed directly. This is the opposite of the forward proxy and what is meant by reverse.
The reverse proxy requires no configuration or special knowledge by the client other than the server’s address.
The reverse proxy is less visible and considered more secure as resources returned to the client appear as though they originated from the proxy server itself, hiding the existence and characteristics of the origin server(s).
2.4 Uses of reverse proxy
- Sarah has a website that millions of people want to see, but a single web server cannot handle all the traffic. She sets up many servers and puts a reverse proxy on the internet that will send users to the server closest to them where they try to visit her site. This is one way in which the Content Distribution Network (CDN) works.
3. NGINX
3.1 How does NGINX work?
NGINX, pronounced engine-x, is an open-source web server which serves more 25% of websites across the globe, including the majority of the world’s 100,000 busiest websites.
It is suitable for web serving, reverse proxying, caching, load balancing, media streaming, and more.
NGINX uses an asynchronous event-driven model meaning that each request can be executed concurrently without blocking each other, much like how different water sources travel through the same pipe.
The official docs can be found here, a thorough introduction can be found here.
3.2 How does NGINX work?
• When you typically make a request to open a webpage, your browser contacts the server which looks for the necessary files to display your requested page in your the browser.
• This request is considered a single thread (process) and traditionally, web servers create a single thread for every request.
• However, NGINX does not work that way. As stated before, NGINX uses an a synchronous event-driven architecture which means that similar threads are managed under one worker process. Each worker process contains smaller units called worker connections. This whole unit is then responsible for handling request threads.
• Worker connections deliver the requests to a worker process, which will also send it to the master process. Finally, the master process provides the result of those requests.
• One worker connection can take care of up to 1024 similar requests. Because of that, NGINX can process thousands of requests without any difficulties. For this reason, NGINX is particularly suited to busy websites that deal with e-commerce, search engines, and cloud storage.
• This architecture uses small, but more importantly, predictable amounts of memory under load. Even if you don’t expect to handle thousands of simultaneous requests, you can still benefit from NGINX’s high-performance and small memory footprint.
4. Install Nginx on Linux
We will now go ahead and configure Nginx as a reverse proxy for our Ubuntu, although this will probably be similar for other Linux distributions, see the NGINX admin guide. For information on configuring NGINX for production environments, check out this link, Getting Started with NGINX series.
- Because Nginx is available in Ubuntu's default repositories, you can install it using the apt package management system.
Firstly, update your local package index with the following command:
sudo apt update
Then install Nginx:
sudo apt install nginx
The installer creates a systemd init script that runs Nginx as a daemon (a background process) on system startup.
- Before we can test Nginx, we need to reconfigure our firewall to allow access to the service. Nginx registers itself as a service with ufw, our firewall, upon installation. This makes it rather easy to allow Nginx access.
We can list the applications configurations that ufw knows how to work with by typing:
sudo ufw app list
You should get a listing of the application profiles:
Output
Available applications:
  Nginx Full
  Nginx HTTP
  Nginx HTTPS
  OpenSSH
As you can see, there are three profiles available for Nginx:
Nginx Full: This profile opens both port 80 (normal, unencrypted web traffic) and port 443 (TLS/SSL encrypted traffic)Nginx HTTP: This profile opens only port 80 (normal, unencrypted web traffic)Nginx HTTPS: This profile opens only port 443 (TLS/SSL encrypted traffic)
It is recommended that you enable the most restrictive profile that will still allow the traffic you've configured. Since we haven't configured SSL for our server yet, in this guide, we will only need to allow traffic on port 80.
Network ports are the doors of your router/moden to the internet, 65,535 doors and each door allows for one function. For example, door 25 allows mail to flow in and out and is called (Simple Mail Transport Protocol - SMTP Port). By controlling what doors are open and closed, you control what kind of traffic can come in and leave your home/office. With NGINX, we can control which ports link to which services and even different websites, but more on that later!
You can enable this by typing:
sudo ufw allow 'Nginx HTTP'
You can verify the change by typing:
sudo ufw status
You should see HTTP traffic allowed in the displayed output:
Output
Status: active

To                         Action      From
--                         ------      ----
OpenSSH                    ALLOW       Anywhere
Nginx HTTP                 ALLOW       Anywhere
OpenSSH (v6)               ALLOW       Anywhere (v6)
Nginx HTTP (v6)            ALLOW       Anywhere (v6)
Since NGINX was installed for the first time, explicitly start it by running
sudo service nginx start
NGINX will handle the rest and listening on port 80, should redirect incoming requests from the internet accessing your machine’s IP address to a designated page, which by default is NGINX’s landing page
You can verify this by simply typing your server IP address in your browser's address bar. For example:
http://46.194.75.255.
5. Configuring NGINX
All NGINX config files are located in /etc/nginx, so cd there and poke around.
The place you'll want to add new configurations is in the sites-enabled folder. If you check this folder out, you'll find that there's a single text file called default in there. This file up contains nginx's configuration and the routing to the NGINX's "welcome to nginx" landing page.
Now, let's make our own config file which will contain the bare basics to display a page.
Make a copy of default inside sites-enabled called 'test'.
cp default test
Open it up in your text editor of choice, GNU nano is typically the default packaged with most Linux distributions.
sudo nano test
NOTE: you'll also find a sites-available folder in the NGINX directory. If you find yourself managing many different sites, this folder can help keep things organised. Add your NGINX configuration files here instead and then symlink them to sites-enabled.
You can think of a symlink or symbolic link as a shortcut to a file or directory (folder). Unlike a traditional shortcut such as in Windows, symbolic links may be used in the command line, or in a script or another program.
On Ubuntu, this is often done like this using:
sudo ln -s /etc/nginx/sites-available/dotcom /etc/nginx/sites-enabled/dotcom
Replace its content with the following bare bones configuration. This is the configuration recommended by Microsoft.
server {
    listen        80;
    server_name   example.com *.example.com;
    location / {
        proxy_pass         http://localhost:5000;
        proxy_http_version 1.1;
        proxy_set_header   Upgrade $http_upgrade;
        proxy_set_header   Connection keep-alive;
        proxy_set_header   Host $host;
        proxy_cache_bypass $http_upgrade;
        proxy_set_header   X-Forwarded-For $proxy_add_x_forwarded_for;
        proxy_set_header   X-Forwarded-Proto $scheme;
    }
}
What’s going on here? Let's break it down!
Firstly, NGINX config files use their own language, but the good news is that it's super simple. Much like css, namespaces are declared followed by a block which is bound on either side by curly braces. Let's examing the top most block: server.
server
The highest level block is server, inside this block, we can add key-value pairs followed by semicolons as well as nested blocks.
The server block is very straightforward. It creates a web server listening for incoming connections on the port specified matching the hostname specified.
listen
This directive specifies the port that your server will listen on.
If no port is specified here, port 80 will be used which is typically your machine's default port for the internet. Although not strictly necessary to enter, it's considered good practice for sake of clarity.
server_name
This directive is essentially a matcher for the url bar. Whenever any sort of request comes in to NGINX, it takes a look at the incoming url and looks for a server block that has a matching server_name directive. So, if your site was at https://example.com, your server_name for the root would be example.com.
This is very powerful If you think about it as it this means you can host numerous sites, even coming from different domains, on a single NGINX configuration. All you have to do is set up an a record that points the domain to your machine’s IP, then sort out the rest with NGINX server configs.
TRIVIA A record maps a domain name to the IP address of the computer hosting the domain. Configured and managed by your host provider, it is the link between your website’s name and the IP address of the machine your files are on.
In addition; you can also use server_name director to deal with subdomains. For example, if you want to match https://test.example.com, you can easily do this, and even map it to an entirely different app.
Additionally, you can perform some wizardry with the value of server_name. by using regular expressions to match routes and even wildcards,
Wildcard names are indicated by indicated by a * only on the name’s start or end, and only on a dot border. The url name “*.example.org” matches not only www.example.org but connected subdomains such as www.sub.example.org as well.
location
After a request finds a server, it has to match a location block which contains the logic instructing NGINX on respond . Requests are matched to a location block from most to least specific match. In this case, we only have one location block and use / to match all requests to the site’s default "root" page.
If you made a second location block with location /admin, all requests to example.com/admin would be routed there.
Location takes two parameters, a string/regex and a block.
location <Parameter 1> {<Parameter 2>}
The first parameter matches the incoming request to a specific location, based on the exact URL, a portion of the URL, or a regex matching the URL.
Let’s cover the parameters appearing in the second block of the Microsoft sample code.
proxy_passis simple. It tells NGINX that you have an external handler for this request. It can be a domain name, IP address, or UNIX socket.proxy_http_versionsets the HTTP version to 1.1 instead of 1.0. More on this later.proxy_set_headertells NGINX that your application is expecting certain headers. HTTP headers are key/value pairs.X-Forwardedpasses on the IP address and protocol of the original request to your backend application, because if not for this the application would only see NGINX as communicating with it.Setting proxy headers Upgrade $
http_upgradeandConnection keep-aliveare for handling websocket connections through the proxy. Websockets are a newer standard, relative to the traditional HTTP model, in bidirectional communication between the client and server. This is also why you're declaring HTTP 1.1 over 1.0 above, because you need to be on 1.1 to upgrade your HTTP connection to a websocket connection.Finally
proxy_cache_bypass $http_upgradetells NGINX that requests should not be handled from cache if they are websocket upgrade requests.Changes made in the configuration file will not be applied until the command to reload configuration is sent to NGINX or it is restarted. To reload configuration, execute:
nginx -s reload
When NGINX runs, it consumes the configuration files you have put into /etc/sites-enabled and uses those to know what to display to your viewers.
6. End
NGINX is now rerouting our server_name to http://localhost:5000, where our .Net Core application will be running!
7. Other Nginx config tips
The rest of a line after the # sign is considered a comment.
The root directive - although not in the code in section 5, you can use this directive to serving static sites if you are just trying to lay down some html and css, the root directive will specify the directory that you have stored your files in.
References
http://www.kegel.com/c10k.html https://www.linode.com/docs/quick-answers/linux-essentials/what-is-systemd/