How to Choose CSS Selectors For Best Specificity? IDs vs Class.
CSS offers developers a wide range of selectors.
They allow you to target specific HTML elements, such as headings, paragraphs, links, images, and more, and apply styles to them.
There are several types of selectors in CSS, including:
- Element selectors: Target specific HTML elements, such as
porh1. - Class selectors: Target elements with class attributes, such as
.nav. - ID selectors: Target elements with specific id attributes, such as
#main-header. - Attribute selectors: Target elements based on their attributes, such as
a[href='https://www.example.com']. - Pseudo-class selectors: Target elements based on their state, such as
a:hover(when a link is hovered over with a mouse). - Pseudo-element selectors: Target specific parts of an element, such as
p::first-line(the first line of a paragraph).
Where are ids are the most specific, element selectors are the least.
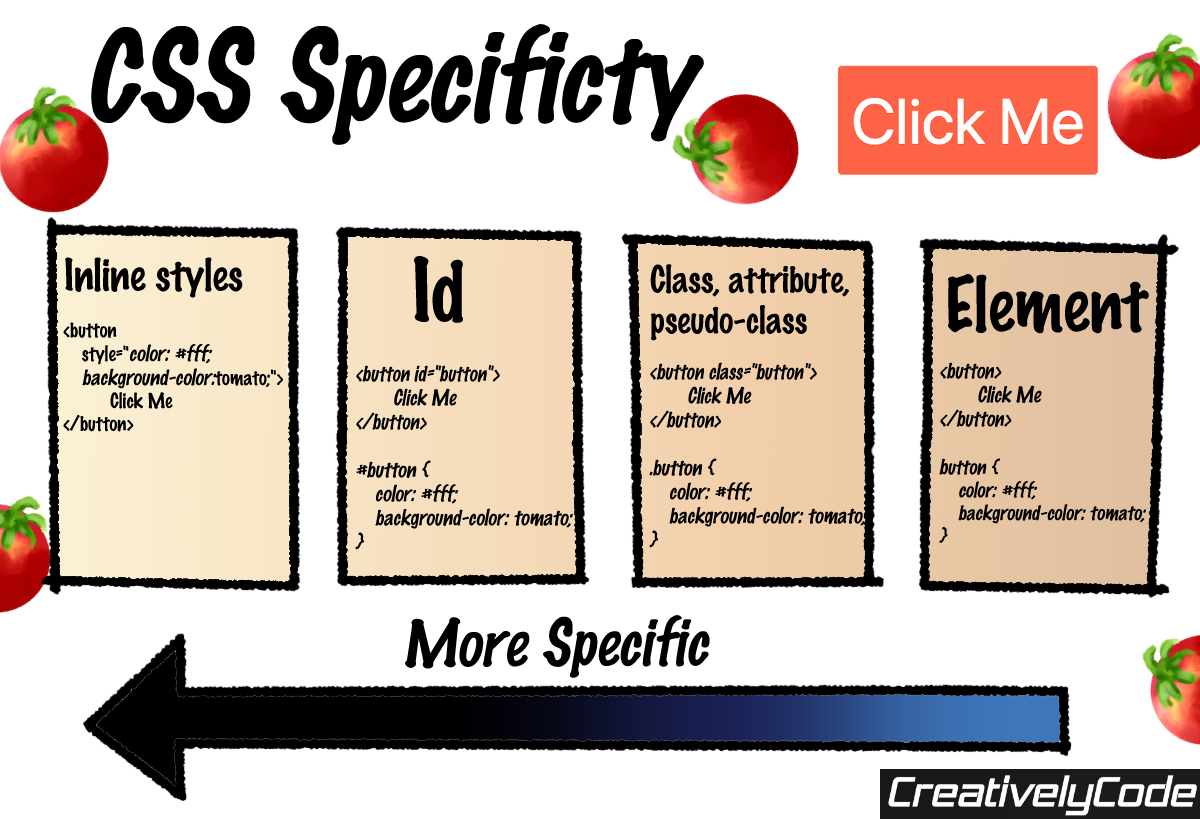
In other words, if you style an element with both an id selector and a class selector, the properties from the id selector take priority and trump any of the same properties from the class selector.
By combining selectors, you can create complex CSS rules that target specific elements on your web pages with precision. For example, you can combine class and ID selectors like so:
#header .nav {
  display: flex;
  width: 100%;
  padding: 2rem;
}
This will select all elements with a class of nav-item that are within (descendant) an element with an ID of header.
With a wide array of options available, choosing the right selector and level of specificity can sometimes be a challenge.
So which selector should you use and when?
Well, generally speaking, the more selective you are in your choice of CSS selectors, the easier it is to avoid styling conflicts.
However, that does not mean you should always opt to be as specific as possible.
As, otherwise, you can easily confuse yourself and clutter your style sheets with repetitive code.
Writing CSS is actually a balancing act between specificity and dryness (clean code). We want to be sufficiently accurate in our targetting of the right elements whilst minimizing our impact on overall maintainability.
With that in mind, in this article, I break down when I roughly use each selector type.
When to use IDs?
ID selectors are best used for elements that appear only once on a page, and that have a unique role or purpose.
For example, if you have a header or a footer that appears only once on the page, you could use an ID selector to target that element specifically.
Be careful with ID selectors and only use them for elements which are truly unique, this is because they pose several challengers for developers:
- Specificity: ID selectors are arguably too specific! This can make it difficult to update styles in a consistent way across your site as any styling done through an ID selector will override conflicting style properties from a class or element selector.
- Reusability: Styles associated with an ID can only be applied to one element on a page. On the other hand, styles associated with a class or element can be applied to multiple elements. This means that using other more multi-purpose selectors types can make your CSS more modular and easier to maintain.
For the reasons above, I generally avoid IDs for styling.
However, one place where IDs work well are when you're working with JavaScript! IDs work great as 'anchors' for JavaScript DOM querying functions.
When to use Classes?
Generally, you should use a CSS classes when you want to apply the same styles to multiple elements. Classes offer a good balance of specificity and flexibility. They are more specific than element selectors, but less specific than ID selectors, making it easier to target the right elements without over-specifying your styles.
I don't like styling with IDs but I love classes, they're my go-to for all of my styling needs. That includes when I'm styling a single, unique element that'd typically get an ID. Why? Well it might be unique for now, but that might not be true in the future as my website grows.
Here are other reasons I do the bulk of my styling with classes:
- They're Semantic: custom class names express what a particular styling does. Classes can even be used to provide meaningful information to assistive technologies, such as screen readers, helping to make your web pages more accessible.
Quick tip: If you're ever stuck for class names, you can look at what other developers do by visiting your favorite website and opening up developer tools (pressing ctrl/fn + F12 on your keyboard). After which, click on the Elements tab for a peak at the code.
Maintainability: Classes make it easy to update and modify styles even when your HTML structure changes. You only need to update the class selector in your CSS code, rather than having to find and update every instance of the style in your HTML.
Lends itself well to naming conventions such as BEM. Naming conventions are important in programming and web development because they help to make code more readable, maintainable, and easier to understand for both ourselves and fellow team mates. My favorite convention is called BEM and it's built on CSS classes.
These benefits make classes a versatile and powerful selector in CSS, and they are often the preferred choice for most of my styling needs.
I reserve IDs for JavaScript, separating styling from logic, even for content dynamically generated by JavaScript or served server-side.
Complex Selectors
Complex selectors in CSS are selectors that allow you to target elements based on their relationship to other elements in the HTML document.
They consist of two or more selectors combined, for example, section .article selects all elements containing class ".article", that are descendants of <section> elements. This is called the descendant complex selector. In other words, any element with the associated class inside of a div on your site. You can mix and match any selector type, such as IDs, classes and element selectors.
Complex selectors are undoubtedly powerful tools for creating specific styling rules. By combining simple selectors and using different combinators, you can create precise and highly targeted styles for your HTML elements.
However, and this will surprise you.
Complex selectors make up a small portion of my style sheets, for a couple of reasons:
Specificity: Complex selectors can sometimes create specificity issues, where styles from one selector override styles from another selector unexpectedly. This can lead to unintended styling effects that can be difficult to debug.
Maintenance: Complex selectors can be difficult to understand and maintain, especially for developers who are not familiar with them. This can lead to problems when updating or modifying styles in the future.
Performance: Complex selectors can slow down the performance of your web page, especially if they are used in large quantities. This can have a negative impact on the user experience, particularly on mobile devices with limited processing power.
Browser compatibility: Some complex selectors may not be supported by older browsers, which can lead to inconsistent styling across different devices and browsers.
I find myself using complex selectors for isolated situations, typically in smaller projects where I'm trying to save time. For example, if I want to quickly style all direct children of an unordered list element (<ul>), perhaps inside of a navigation bar, I might opt for the direct children selector.
<nav>
  <ul>
    <li><a href="default.asp">Home</a></li>
    <li><a href="news.asp">News</a></li>
    <li><a href="contact.asp">Contact</a></li>
    <li><a href="about.asp">About</a></li>
  </ul>
<nav>
nav > ul > li {
  .margin-right: 2rem;
}
Using >, this is a little different from the descendant selector described above and selects all <li> elements that are direct children of a <ul> that is a direct child of my <nav> element.
Element selectors
Examples of element selectors include: <html>, <body>, <div>, <h1>, <button>, etc, and are selected like so:
// select all buttons
button {
  background-color: tomato;
}
Directly selecting an element is best avoided and I don't use these selectors except for one scenario, CSS resets.
What are CSS resets? Resets are a set of CSS styles that are applied to a webpage that reset the default browser styles of various HTML elements. For example, you can reset all buttons or headings across your site to reflect your desired, generic, styling. CSS resets are also used to create a level playing field across different browsers, so that web developers can apply their own styles to HTML elements without having to worry about the inconsistencies in the default styles of different browsers. This can make it easier to create consistent, cross-browser compatible layouts and designs.
Common CSS reset styles include resetting the margins and padding of elements, as well as setting default font styles and sizes.
h1 {
  font-size: 2rem;
}

h2 {
  font-size: 1.5rem;
}

h3 {
  font-size: 1.3rem;
}

h4 {
  font-size: 1rem;
}

h5 {
  font-size: 0.8rem;
}

h6 {
  font-size: 0.7rem;
}
Summary
In this article, I have demonstrated how I best leverage specificity in CSS.
Opinions can differ between developers and when in doubt I highly advise not over thinking it and you'll soon find what works intuitively best for you!
But Wait.. What About the Others
Attribute selectors
[attribute=value]:
Attribute selectors target elements that have a specific attribute with a value that is either equal or not equal (using "!") to a specified value.
For example, to target all input elements that do not have a type attribute with the value "text", you can use the selector input[type!="text"].
You could also dynamically style disabled inputs:
input[disabled]
I have rarely found myself using attribute selectors, if at all.
Although, on the occasions I have use them, I've found them effective when for example, targeting dynamically generated content - ie. where there is no prior control and no opportunity to apply a class.
For example, you could style links pointing to a particular domain:
a:not([href^="http://mydomain.com"])
[attribute^=value][attribute$=value]:
You could go one step further and target elements that have a specific attribute with a value that both starts with a given string and ends with a given string.
For example, to target all elements with a href attribute that starts with "https://" and ends with ".com", you can use the selector a[href^="https://"][href$=".com"].
Pseudo-elements and Pseudo-classes
Examples of pseudo-classes: :hover, :checked, :active, :nth-child(), ::first-line
Their use case is so niche that it goes without saying that these are totally fine and typically the only way you can target pseudo things. Although, again, I would you this in conjunction with class selectors.
.button:hover {
  background-color: tomato;
}